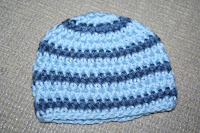
This is a preemie sized (11-12" circumference) hat that I designed after The Preemie Project (www.thepreemieproject.com) put out a call for Easter and spring themed hats. I found other patterns but the ears were made in the round which made them quite heavy, not really appropriate for such tiny babies. This one is simple and easy with no frills. Make them up in every pastel color imaginable and donate away to your local NICU!!!
I am also including several variations that use the basic beanie hat the bunny ears are attached to. I bore easily and these variations keep me exciting to be making these hats. If I'm going to reach my goal of donating 100 hats this year I have to keep it interesting!!!
As with all my free patterns you are welcome to use your finished items for any purpose you wish. Please do not reproduce or sell this pattern and take your own photos, mine aren't that great anyways!
Materials: Size H crochet hook (G for smaller preemies, I for larger preemies), a little over 1 oz of light worsted weight yarn (I used Caron Simply Soft), tapestry needle for weaving ends and attaching the ears.
Notes: Pattern is written in standard US crochet terms. Beginning chains do not count as stitches throughout the pattern.
Basic Hat
Ch 2 does not count as a stitch throughout the pattern
Round 1: Start with a Magic Circle, ch 2 and work 10 dc in the magic circle, pull tight and sl st to 1st dc. (10 dc)
Round 2: Ch 2, work 2 dc in each st around, joing with a sl st to the 1st dc. (20 dc)
Round 3: Ch 2, work 1 dc in the same st as the ch 2, *work 2 dc in the next st, 1 dc in the following st*, repeat from * to * around, join to first dc with a sl st. (30 dc)
Round 4: Ch 2, work 2 dc in the same st as the ch 2, *work 1 dc in the next 5 st, work 2 dc in the following st*, repeat from * to * around, join with a sl st to the first dc. (35 dc)
Rounds 5-8: Ch 2, work 1 dc in each st around joining with a sl st to the first dc. (35 dc)
Round 9: Ch 1, work 1 sc in each st around joinging with a sl st to the first sc. (35 sc) Fasten off and weave in the end.
Ears (make 2)
The ch at the beginning of each row does not count as a st. Crocheting tightly will give you and ear that is stiff enough for you to mold the shape a bit which gives you some versatility with the finished look.
Row 1: Ch 5, turn and sc in 2nd ch and each ch accross. (4 sc)
Row 2: Ch 1, sc in each st accross. (4 sc)
Row 3: Ch 1, work 2 sc, sc sc, 2 sc. (6 sc)
Row 4-6: Ch 1, sc in each st accross. (6 sc)
Row 7: Ch 1, sc2tog, sc, sc, sc2tog. (2 sctog and 2 sc)
Row 8: Ch 1, sc in each st. (4 sc)
Row 9: Ch 1, sc2tog twice (2 sc2tog)
Row 10: Ch 1, sc2tog (1 sc2tog)
Row 11: Ch 1, sc. (1 sc)
Sc in down the side of the ear, sl st accross the bottom (the starting ch), and sc up the other side of the ear joining at the top of the ear with a sl st. Fasten off and weave in the ends.
Using a 12" length of yarn and the tapestry needle sew each ear to the top of the hat through the sl st on the bottom of the ears. I position on the top just outside of round 2 of the hat but place wherever you think is visually appealing.
Other Variations: This basic hat pattern is super versatile and is my go-to pattern for making charity hats.
Pom-pom hat: Add a pom of any size to the top, I especially like to do a two color pom and use the contrast color as the sc edging (row 9)
Striped Hat: switch yarn colors every other row. The example in the photo is worked in the colors of our local college (go Hawkeyes!)
Thick Thin Stripes: Use two colors of yarn, use one color for two rows then the other for one, keep switching back and forth in this manner.
Football Hat: Work rows 2 and 8 in a contrast color, Use a long piece of the contrast color and a tapestry needle to embroider laces onto the finished hat.
Shelly Edged: On row 9 work a sc, hdc, dc, hdc, sc pattern around joining with a sl st to the first sc.


No comments:
Post a Comment